September 17, 2020

There has never been a better time to upskill your own beauty talents – starting with your nails.
Clean your nails - The perfect manicure begins with the base. That means, spending the time to do all the work that a nail technician would normally spend half your appointment doing. Start by removing any remnants of old polish with nail polish remover, and if you’re not wearing polish, wipe your nail beds anyway so they’re free of oil and dirt and then wash and dry your hands.
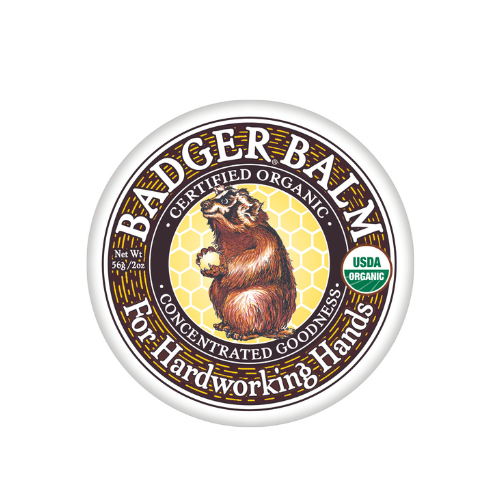
Prep the surface - Next, move onto clipping and filing into shape. Instead of filing back and forth, try only moving in one direction as this will be gentler and help avoid breakage. If you have a buffing block, gently buff to remove any ridges and create a smooth painting base. Apply a cuticle cream (like this one from Badger Balm) and gently push back the cuticles. Never cut your cuticles as they’re there to protect your nails.
Scrub and Soften - Using a body scrub, rub over your hands and forearms gently. Exfoliation removes dead skin cells which helps make way for the new cells, not to mention making your hands feel softer and smoother and more susceptible to the benefits of moisturiser. Make sure to remove any debris from underneath your nails again afterwards and then wash and pat dry. Next, massage hands with a nourishing hand cream (like this nourishing lotion from Tokyo Milk), paying special attention to any rough areas, your cuticles and inside of the palms which may get cramped from computer work.
Time to paint - Every nail lover knows that skipping a base coat is the equivalent of “why bother”. Not only will it protect the nails, it’ll also help prevent chips. So begin with a high-quality base coat. The key to a mani that lasts isn’t actually a steady hand, but patience. Many manicurists will recommend waiting two minutes between each coat to ensure it’s really dry. Then, it’s time for colour. If you’re new to DIY painting, choose a neutral, as it will be more forgiving if you make a mistake. Or, go bold with a classic red. Take extra care with your first coat, as getting this perfect will create a good base for the following coats. Paint down to the cuticles and to the edges using only a thin coat. Try not to overload the brush, but have enough on it that you don't have to double dip, and try brushing in two or three strokes. Again, wait a couple of minutes before you apply your second coat (and third if it’s a particularly sheer polish). Then finish with the all-important top coat. This will seal in your handiwork, prevent further chipping and add shine. Wait at least five minutes for everything to dry (longer if you can), then sit back and admire your handiwork.
Pro paint tip! - If you struggle painting with your non-dominant hand, try keeping the non-dominant hand steady (like resting on a table or bench) and instead, move your dominant hand to the paintbrush for each finger to give you more control.

Simple instalment plans available instantly at checkout


Use your existing debit or credit card

No long forms, instant approval online

Pay fortnightly, enjoy your purchase straight away!
All your need is:
1) An Australian Visa or Mastercard debit/credit card; 2) To be over 18 years of age; 3) To live in Australia
To see Afterpay's complete terms, visit https://www.afterpay.com.au/terms
© 2026 Afterpay